


As a developer, you know that testing is crucial to the success of your application. However, it can be time-consuming to test each endpoint separately, typing in your local host URL with the slash, etc. I came across a much better way to achieve the same result without burning much time, keeping your endpoints saved and decent.
In this article, we will explore a technique for streamlining your endpoint testing process by creating a Postman collection and utilizing a global variable to store your URL. By doing so, you can conveniently test all of your endpoints by simply updating the URL variable in one central location. This approach will save you valuable time and energy, enabling you to concentrate on other crucial aspects of your development process. So, let's get started!
I'd assume you already have your endpoints ready to be tested. In my case, I'd be using the endpoints from the e-commerce API I'm currently working on, as a demo for this process. So, stay with me.
P.S. I'm using the Postman GUI.
On your Postman desktop(GUI), create a new collection by clicking on the "+" plus sign on the top left corner of your interface. You can name it anything you want but I named mine e-commerce.
After naming the collection, you'd notice it says:
"This collection is empty. Add a request to start working."
This means that you've successfully created a new collection. Ordinarily, we would just create a new request, type in our URL, and move on. However, the next couple of steps are the most interesting part of this article, so again, stay with me.
The next step to take after creating a collection is to set up a global variable. You might be wondering 💭, a global variable? Yes! a global variable. This variable helps us hold our URL in place, a similar function to declaring a variable in our code.
In our case, we would set up localhost/3000/api/v1 in the environment quick look button. This is located at the top right-end corner of your interface.
Next up is to set our variable in place. To do this, click on the eye icon at the top-right end corner of your interface. When you do this, it says:
"No active environment - add".
Just to be on the same page, the image above shows the eye icon we would be clicking that presents another page where we add an environment.
Now that we are on the same page, in the variable option, type in URL, and then paste your URL in the initial value option, then save.
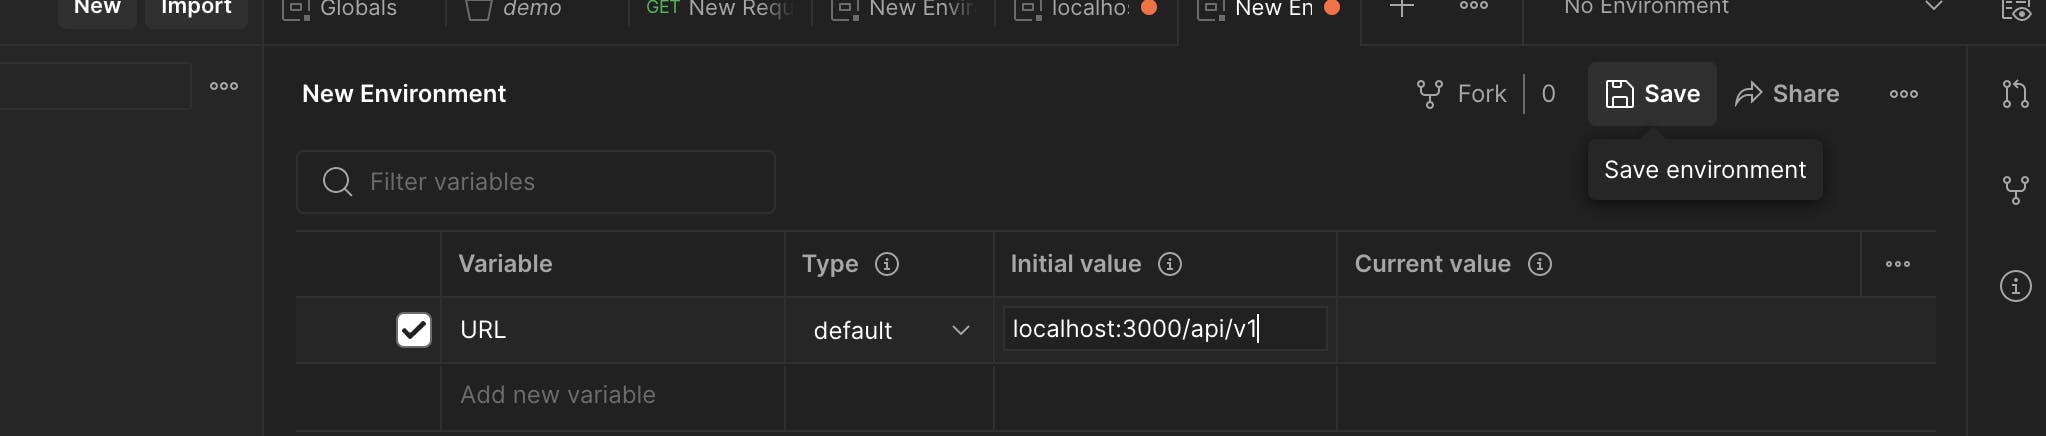
The picture above ☝️ should be exactly what you have on your end (feel free to tweak yours if you're not versioning your API). Make sure to save the new environment as well.
When you go back to your collection, assuming you want to create a new request, you'll type in double curly braces {{, and it'll give you access to the URL you saved. Tap on it, close it, and then add a forward slash as you'd typically do when testing an endpoint and send. You will get your server response for sure!

The image above ☝️ is what yours should be looking like. In my case, I got all items from my database.
Now, you can save the request by clicking Save at the top right. To your left in the collection folder, click on the three dots, and name that request 'get all items'.

The image above is what you should have on your end. This way, it's easier to test endpoints instead of the traditional way of typing them out.
Also, you can do this for other endpoints. It's not restricted to only GET request.
Let's test a POST-endpoint.
Here, we change the request from a GET to a POST request; type in the double curly braces {{}} that gives us access to the URL variable. After which, we add the forward slash / used in accessing the route we are about to test. As soon as you're done testing and it works as expected, we save the request and name it as we did for the GET request.
I named mine "create items". Here's 👇 a visual explanation of what we have just done.

As you can see, we have successfully created, tested, and saved a POST endpoint.
I absolutely love this method or process of testing endpoints or routes of my application. I find it satisfying, to say the least. It makes my collection organized and readable. Not just that, I can always come back to this at any point in time, and I would know exactly where to pick up from. I love it, and I hope you do too.
I hope you found this article helpful, and I encourage you to put this method into practice by testing your other endpoints.
If you have any questions or feedback, please leave a comment below and let me know. Also, feel free to share this article with anyone who might find it useful.