Build a CRUD API with Typescript, Node.js, Express and PostgreSQL

As a Software developer, working with APIs is crucial for seamless communications between software systems. In this tutorial, we will explore API development and learn how to build a CRUD RESTful API in a Node.js environment using TypeScript. We will run this API on an Express server, utilizing the robust capabilities of PostgreSQL as its database.
This tutorial aims to comprehensively demonstrate how to build a to-do list application using TypeScript, PostgreSQL, and Express. While all three technologies play crucial roles in the project, we will particularly highlight the capabilities and benefits of TypeScript and PostgreSQL within the context of this application.
What is a REST API?
In simple terms, a RESTful API (Representational State Transfer API) is a set of rules and conventions that allow different software systems or applications to communicate and exchange data with each other over the Internet.
If you’d like to know more about REST APIs, check this article.
What is a CRUD API?
A CRUD API provides four fundamental operations for managing resources: Create, Read, Update, and Delete. It allows applications to perform these basic data manipulation tasks on resources through standardized HTTP methods.
For example, a simple CRUD API for a to-do list application allows users to:
Create a new to-do item (C) by sending a POST request with the task details.
Read the list of all to-do items (R) by sending a GET request to retrieve the tasks.
Update an existing to-do item (U) by sending a PUT or PATCH request with the updated task details.
Delete a to-do item (D) by sending a DELETE request with the ID of the item to be removed.
What is Express?
Express is a popular and widely used web application framework for Node.js. It simplifies the process of building robust and scalable web applications and APIs. With Express, developers can define routes, handle HTTP requests and responses, and implement middleware to add various functionalities to the application.
What is Typescript?
TypeScript is like having a detailed cooking recipe with labeled ingredients(optional static typing), helping you cook better and avoid mistakes. And just like you need to convert your special recipe into regular cooking for everyone to enjoy, TypeScript gets turned (transpiled) into plain JavaScript for it to work anywhere JavaScript is used.
What is PostgreSQL?
PostgreSQL, often referred to as Postgres, is a powerful open-source relational database management system (RDBMS). It is known for its advanced features, extensibility, and support for complex data types and queries and supports many operating systems such as Linux, Windows and MacOS. There are a few others like MySQL, MariaDB, etc.
What is Node-Postgres?
Node-Postgres is a collection of node modules. It is like a bridge that helps your JavaScript code talk and interact with a big database-in this case, PostgreSQL. Imagine you have a notebook where you store important information, and you want to be able to write, read and or retrieve information from it using your computer.
Node-Postgres is the tool that helps your computer understand the notebook's language and organize everything neatly.
Creating a PostgreSQL database
We’ll begin this tutorial by installing PostgreSQL, creating a new user, creating a database, and initializing a table with a schema and some data.
Installation:
If you’re using Windows, download a Windows installer of PostgreSQL. On the other hand, if you're using Mac, there are two ways to go about installation. One way is through the terminal using homebrew and the second option is directly installing the package from the website itself.
In this tutorial, I'm going to show you how to install using the installation package and then connect with it using the editor called pgAdmin.
Step 1: Download the installation package by visiting Postgres.
Step 2: click the download button at the top of the screen and on the download page, click the macOS option.
Step 3: Under the macOS page, click on the download installer option under the interactive installer by EDB section. You'll be taken to the EDB website; click on the version you'd like, preferably the latest and most stable version. The file will begin downloading.
Step 4: After downloading, open the file, enter your account password, and then you'll see a splash screen for a moment. Leave the default values and click next for the next couple of actions and then, provide a password to use for the Postgres database. You'd need to remember this password for when next you want to connect to the database. After this, you'd see the port value prompt, click next and make sure to leave the default values and click next for the next couple of actions. The installation begins.
Step 5: Once the installation is complete, it'll as if you want to run "stack builder"; uncheck and click finish. Postgres has now been installed and connected to your Mac!
Connecting to Postgres using PgAdmin
To connect to Postgres, open the recently installed file and locate the pgAdmin file inside. Alternatively, you can use your finder app to search for it conveniently.
The system will prompt you to enter a master password. This password is utilized by pgAdmin to secure your database and is distinct from the Postgres password you generated during installation. Enter a password and click 'OK'!
The pgAdmin screen will be displayed; you should see something like this:

Expand the server section to find at least one entry for the initially installed PostgreSQL. Double-click on the entry and input your password (the first password you created during the earlier installation). Then, click 'OK'! And there you go! You have successfully established a connection to the Postgres database.
Utilize pgAdmin 4 to set up a PostgreSQL database:
To set up the PostgreSQL database for our application, do the following:
Launch pgAdmin 4 and log in.
Right-click on
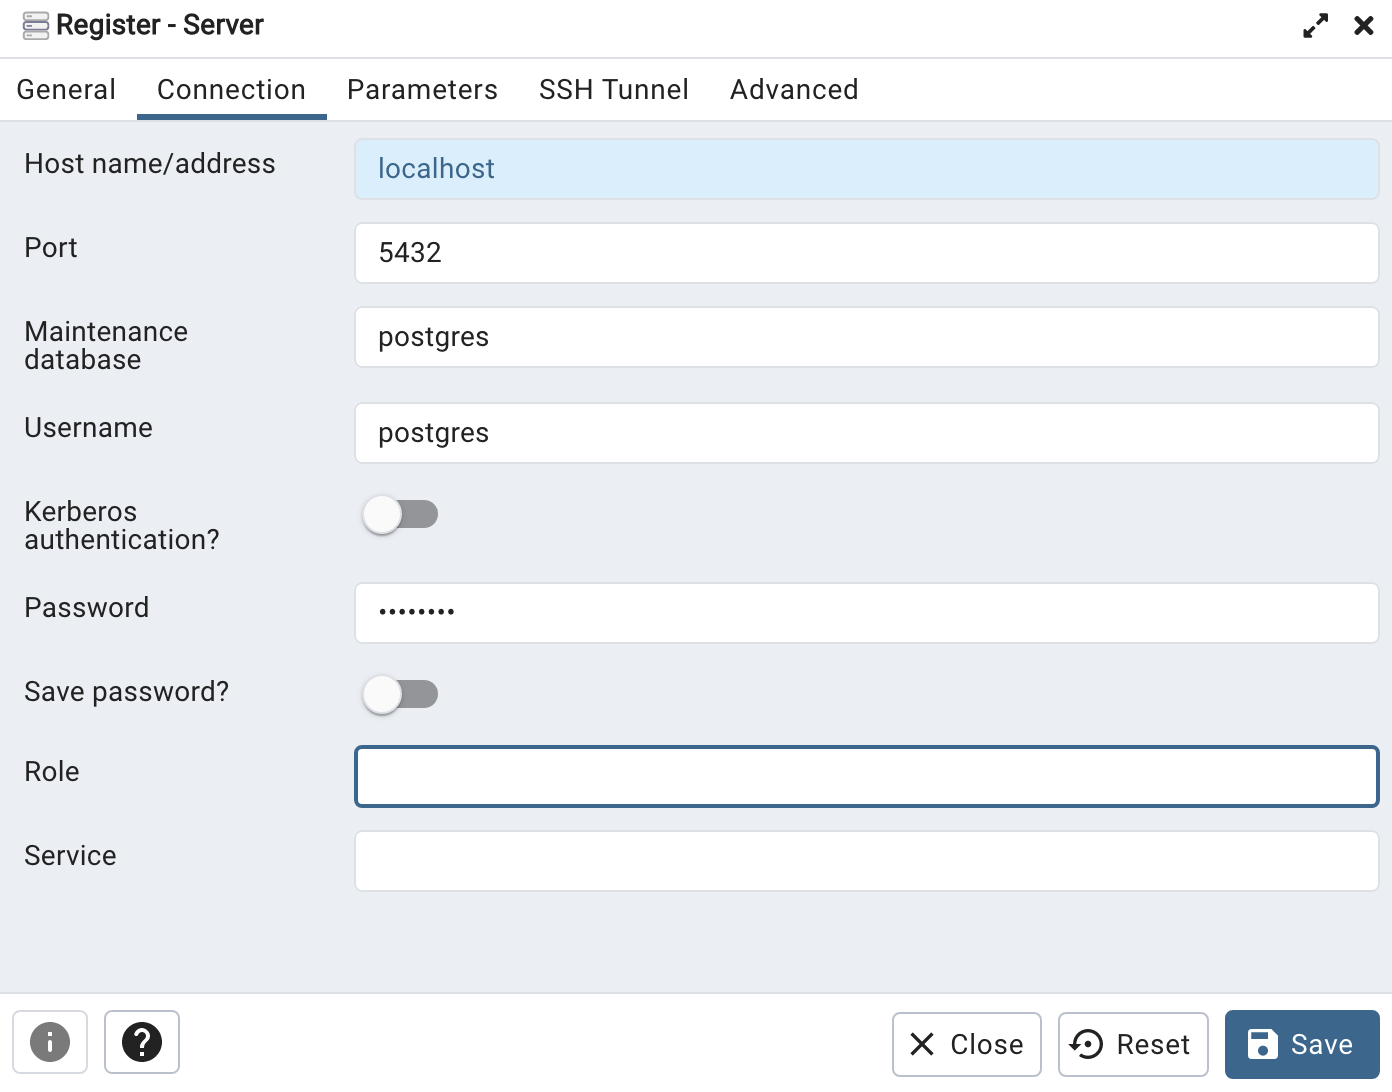
Serversin the navigation and selectRegister>Server...
You should see something like this:Enter connection details by clicking the connection button (hostname, username, password) and save. This is what you should have on your end.
Make sure to remember these details as you'd be needing them soon.

Let's move into the order of the day by setting up our project.
Setting up the project
Let's begin by creating a new directory for our project and initializing it with npm. Open your terminal or command prompt and run the following commands:
Create a project directory:
mkdir todo-list-appNavigate to the project folder:
cd todo-list-appInitialize the project:
npm init -yInstall necessary dependencies:
npm install express pg body-parser typescript @types/express @types/pg @types/node ts-node nodemon --saveCreate two folders: src and dist. All your TypeScript code goes into the
srcfolder, and the compiled JavaScript in thedistfolder.Create a
tsconfig.jsonfile in the root of your project with the following basic configuration:{ "compilerOptions": { "target": "ES2019", "module": "CommonJS", "outDir": "./dist", "rootDir": "./src", "strict": true }, "include": ["src"] }To activate
nodemonin your application, add this to the script object in the package.json file:"scripts": { "start": "node dist/app.js", "dev": "nodemon src/app.ts", "build": "tsc", "test": "echo \"Error: no test specified\" && exit 1" },
Build time with Express
With your project now successfully set up, let's begin delving into the to-do list.
In the app.ts file, we will import the modules installed in step 4, create an instance of an Express app, choose a port, configure middlewares, define routes, and initiate the server using this code snippet:
import express from "express";
import bodyParser from "body-parser";
import todoRoutes from "./routes";

const app = express();
const port = 3000;

app.use(bodyParser.json());
app.use(
  bodyParser.urlencoded({
    extended: true,
  })
);
app.use("/", todoRoutes);

app.listen(port, () => {
  console.log(`server is listening on http://localhost:${port}....`);
});
Note: You could choose whatever port number you like; this is just my presence.
In this code:
Importing Modules: You're bringing in the necessary tools you'll use in your code.
Expressis a framework for building web applications, body-parser helps with handling incoming data, andtodoRoutesare the routes you defined in a separate file.Creating the Express App: You create an instance of an Express application using
const app = express();. This sets up the foundation for your web app.Choosing a Port: You specify a port number
(port = 3000)on which your server will listen for incoming requests. This is like a door number for your web app.Configuring Middleware:
app.use(bodyParser.json()): This line tells your app to use the body-parser tool to handle incoming JSON data. It's like setting up a translator for data sent to your server.app.use(bodyParser.urlencoded({ extended: true })): This configures the body-parser to handle URL-encoded data (like form submissions) with extended options. Another type of data translation.
Defining Routes:
app.use("/", todoRoutes);This line tells your app to use the todoRoutes you imported. These routes define how your app responds to different URLs, like handling requests to show, create, or update to-do items.
Starting the Server:
app.listen(port, () => {...});This line tells your app to start listening on the specified port. When the server starts, it displays a message in the console so you know it's up and running.Type
npm run devin your terminal to start/lift the server.
Connecting to PostgreSQL
To connect to the PostgreSQL that we created earlier, you'll be adding this bit of code:
import { Pool } from "pg";

const pool = new Pool({
  user: "postgres",
  host: "localhost",
  database: "postgres",
  password: "password",
  port: 5432, // or the port you are using for PostgreSQL
});

export default pool;
This code sets up a connection to a PostgreSQL database using a connection pool. The connection pool functions similarly to a group of friends you can rely on whenever you require interaction with the database. You configure the connection details such as your username, password, and database name. Subsequently, you export the connection pool for utilization in other sections of your code.
Be sure to substitute the 'password' with the password you previously generated.
Defining the routes.ts file:
This file sets up different routes for your To-Do List App. It handles getting all tasks, creating tasks, updating tasks, and deleting tasks using the database connection pool created earlier (basically the CRUD spoken about earlier). Each route corresponds to a specific action a user might want to perform in your app, like adding a new to-do item or marking a task as completed.
Importing Modules: Bring in the essential tools from the
Expressmodule and the database connection pool defined earlier.Creating the Router: Create an instance of an
Expressrouter usingconst router = Router();This router organizes and handles different routes for your app.Interface Definition: Define an interface named Todo to outline the structure of a to-do item, encompassing its id, title, and completion status.
 import { Router, Request, Response } from "express";
 import pool from "./db";

 const router = Router();

 interface Todo {
   id: number;
   title: string;
   completed: boolean;
 }
Root Path Route: This route handles requests to the root path
'/'and sends a simple welcome message when someone visits your app.router.get("/", (req: Request, res: Response) => { res.send("Welcome to the To-Do List App!"); });Get All Tasks Route: Our "official" first endpoint will be a GET request. This route handles requests to
/todosand retrieves all tasks from the database, sending them back as JSON. We can put the raw SQL that will touch the API database inside thepool.query()like so 👇🏾router.get("/todos", async (req: Request, res: Response) => { try { const result = await pool.query("SELECT * FROM todos"); const todos: Todo[] = result.rows; res.json(todos); } catch (error) { console.error("Error fetching todos", error); res.status(500).json({ error: "Error fetching todos" }); } });Create Task Route: This route handles POST requests to
/todos, creating a new task in the database based on the data sent in the request body. The API will take a GET and POST request to the /todos endpoint. In the POST request, add a newtodo. In this function, we’re extracting thetodoproperty from the request body and inserting the values withINSERTand store the created task data from the query result using rows.router.post("/todos", async (req: Request, res: Response) => { const { task } = req.body; // TypeScript type-based input validation if (typeof task !== "string" || task.trim() === "") { return res.status(400).json({ error: "Invalid task data" }); } try { const result = await pool.query( "INSERT INTO todos (task) VALUES ($1) RETURNING *", [task] ); const createdTodo: Todo = result.rows[0]; res.status(201).json(createdTodo); } catch (error) { console.error("Error adding todo", error); res.status(500).json({ error: "Error adding todo" }); } });
We'll also do some input validation things with typescript, our safety net by checking if the task data is valid and making sure that the task is not empty and is a string. typeof task !== "string" checks if the task is not a string and task.trim() === ""checks if the task is empty when any extra spaces are removed using .trim().
Delete Task Route: This route handles DELETE requests to
/todos/:id, deleting a task from the database based on the task ID provided in the URL parameter. It checks if the task ID is valid, removes the task from the database, and sends back a "success" response. If something goes wrong, it sends an error response. TheparseInt(req.params.id,10extracts the task ID from the URL, andisNaN(todoID)checks if the ID is not a number. TheDELETE FROM todos WHERE id = $1query is like telling the database to find and remove the task with the given ID.router.delete("/todos/:id", async (req: Request, res: Response) => { const todoID = parseInt(req.params.id, 10); // TypeScript type-based input validation if (isNaN(todoID)) { return res.status(400).json({ error: "Invalid todo ID" }); } try { await pool.query("DELETE FROM todos WHERE id = $1", [todoID]); res.sendStatus(200); } catch (error) { console.error("Error deleting todo", error); res.status(500).json({ error: "Error deleting todo" }); } });Update Task Route: This route handles PUT requests to
/todos/:id, updating a task in the database based on the task ID provided in the URL parameter and the updated task data in the request body.
It checks if the updated task data is valid, modifies the task description in the database, and sends back asuccessresponse. If something goes wrong, it sends an error response. Thetypeof task !== "string"checks if the updated task is not a text-based description, and$1and$2are placeholders for the task description and ID in the database query.router.put("/todos/:id", async (req: Request, res: Response) => { const todoID = parseInt(req.params.id, 10); const { task } = req.body; // TypeScript type-based input validation if (typeof task !== "string" || task.trim() === "") { return res.status(400).json({ error: "Invalid task data" }); } try { await pool.query("UPDATE todos SET task = $1 WHERE id = $2", [ task, todoID, ]); res.sendStatus(200); } catch (error) { console.error("Error updating todo", error); res.sendStatus(500).json({ error: "Error updating todo" }); } });Exporting the Router: Finally, you export the router using the export default router; making it available for use in other parts of your app like so.👇🏾
export default router;
Testing the Application:
Use tools like Postman to test the application's endpoints:
DELETE: http://localhost:3000/todos/:id

Conclusion
By following this tutorial, you've gained insights into effectively employing TypeScript and PostgreSQL within an Express application. You've learned to set up an Express server, connect to a PostgreSQL database, and implement essential CRUD routes using TypeScript. You might want to check out the code on GitHub
